Mira Orbis Betriebsanweisung
Stöbern Sie online oder laden Sie Betriebsanweisung nach Sanitärkeramik Mira Orbis herunter. Mira Orbis User guide [en] Benutzerhandbuch
- Seite / 32
- Inhaltsverzeichnis
- LESEZEICHEN
- Installation and User Guide 1
- Contents 2
- Introduction 3
- Important Safety Information 4
- Caution! 5
- Pack Contents Checklist 6
- Installation 10
- Commissioning 14
- 5 - 10 Secs 15
- User Instructions 16
- Using your Shower 18
- Temperature 19
- Clock Setting 20
- LCD Indications 21
- Fault Diagnosis 22
- Maintenance 26
- Spare Parts 28
- Accessories 28
- Dimensions 30
- Wiring Diagram 30
- Customer Services 31
Inhaltsverzeichnis
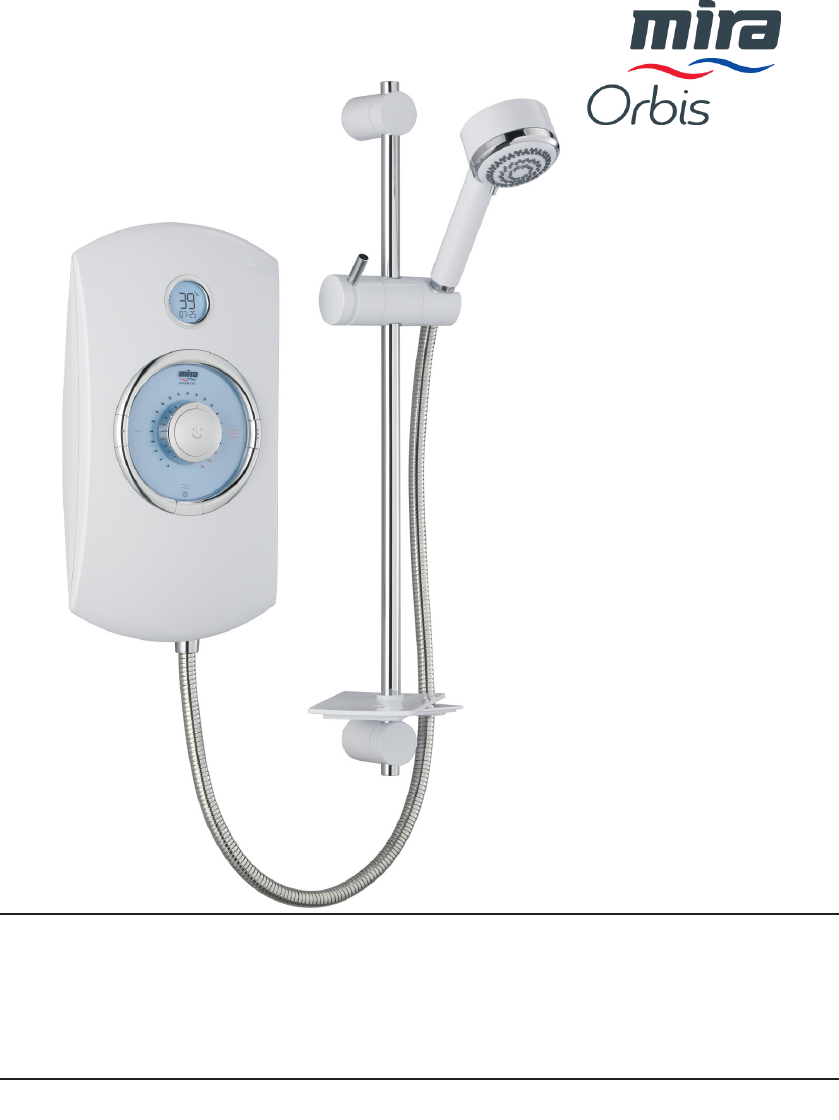
1These instructions are to be left with the userInstallation and User GuideMira Orbis Thermostatic Electric Shower
10Double-poleIsolating SwitchConsumer UnitInstallationInstallation of Mira OrbisWarning! Turn off the electrical and water supplies before proceeding
11Two case inserts are supplied with the Mira Orbis, so that they can be trimmed to suit the supplies entering the product. Before tting the cover, m
12Feed cable into Case. Fit Earth sleeve (not supplied) and strip insulation.Do not twist cable cores.Firmly connect the conductors. Do not exert stra
13Cold Water Supply Pipe (Bottom Entry)Service TunnelFixing ScrewHoles For CoverRetaining ScrewsCase InsertElectrical Supply CableTerminal BlockInlet
14CommissioningIf you are unsure how an electric shower works, please read through the User Instructions section before continuing.Note!
15Turn control to full cold. The temperature will rise slightly as indicated by the temperature indicator.0 - 10 Secs12.11.10.The ow rate will inc
16T h e w a r m e r t h e shower, the lower the ow rate and vice versa.Heated water is produced by adjusting the ow of cold water p
17Water inlet pressure uctuations due to other draw offs (e.g. ushing toilet). Shower temperature will be controlled to within ± 2°C of the set temp
18Using your ShowerRead the section “Important Safety Information” rst.TemperatureLimit IndicatorLow FlowIndicatorTemperatureof ShowerClock (hours/m
19Note! At the end of every shower make sure that the shower head points into the catchment area. A small amount of water may be retained in the showe
2ContentsPatents and Design Registration ...2Introduction ...
20Clock Setting1. Make sure that the product is in ‘Standby’ state (i.e. Isolator switch on).2. Press and hold the ‘Medium Power’ button - th
21Product State LCD Display Backlight CommentsOff Blank Off Product turned off at pull cordStandby Clock shown including second indicatorsDimProduct t
22Fault DiagnosisThe trouble shooting information tabled below gives details on probable causes and remedies should difculties be encountered whilst
23Symptom LCD BackLightLow Flow LightHeater SettingLow/Medium/HighProbable Cause Probable RemedyShower cycles form hot to coldONONONOFFOFFOFFMedium/Hi
24Symptom LCDBackLightLow Flow LightHeater SettingLow/Medium/HighProbable Cause Probable RemedyLow or no ow rateONONOFFOFFAnyAnyHandset blocked.Heate
25Symptom LCDBackLightLow Flow LightHeater SettingLow/Medium/HighProbable Cause Probable RemedyAppliance fails to produce hot water when set on ‘Mediu
26Clean with mild washing up detergent or soap solution. Wipe dry with a soft cloth.Poor shower performance can be avoided by cleaning
27Clock Battery Replacement ProcedureWarning! There are no user serviceable components beneath the cover of the appliance. Only a competent
28Spare PartsMira Orbis405.58 Inlet Connector Assembly406.27 Inlet Filter (with ‘O’ seal tted)416.38 Clamp Bracket (Inlet)416.51 Solenoid Coil156
291647.1061647.1071647.1491647.1041647.1481647.0981647.0991647.100A1647.101A1647.1021647.108416.51A416.38406.27405.581647.1031647.1051647.096BAABBA164
3IntroductionThank you for purchasing a quality Mira product. To enjoy the full potential of your new product, please take time to read this guide tho
30DimensionsWiring Diagram
31Customer ServicesSpare PartsWe maintain an extensive stock of spares, and aim to provide support throughout the product’s expected life.Spa
321075158-W2-A © Kohler Mira Limited, August 2007Mira is a registered trade mark of Kohler Mira Limited.The company reserves the right to alter produc
4Important Safety InformationInstallation must be carried out in accordance with these instructions, and must be conducted by designated, qualied and
5Caution!1. Read all of these instructions and retain this guide for later use.2. The electrical installation must comply to “BS 7671 - Requirements
6Pack Contents ChecklistMira Orbis 3 x Wall Plugs 3 x Fixing Screws 1 x Mira Orbis 1 x Compression Nut 1 x Olive 2 x Case InsertsTick the appropriate
7Specifications1. PlumbingMinimum maintained inlet pressure for 9.0 kW and 9.8 kW, 70 kPa (0.7 bar) for satisfactory operation.Minimum maintained in
8Avoid layouts where the shower hose will be sharply kinked. This may reduce the life of the hose.A Soap Dish/Hose Retaining Ring is supplied to preve
92. ElectricalIn a domestic installation, the rating of the electricity supplier’s fuse and the consumer unit must be adequate for the additional dema
Weitere Dokumente für Sanitärkeramik Mira Orbis

Verwandte Produkte und Handbücher für Sanitärkeramik Mira Orbis
 (36 Seiten)
(28 Seiten)
(32 Seiten)
(32 Seiten)
(111 Seiten)
(2 Seiten)
(36 Seiten)
(28 Seiten)
(32 Seiten)
(32 Seiten)
(111 Seiten)
(2 Seiten)
 (67 Seiten)
© 2020, manymanuals.de. Alle Rechte vorbehalten. | 1.106 s |
 Manymanuals.com
 Manymanuals.de
 Manymanuals.fr
 Manymanuals.it
 Manymanuals.pl
 Manymanuals.cz
 Manymanuals.es
 Manymanuals-pt.com
Kommentare zu diesen Handbüchern